
Ústenka
Ahoj, všichni tvořiví skauti,
Free face mask sewing pattern & tutorial on how to sew double-layered mask. In 3 sizes, small kids, young kids and adult, with changeable elastic bands.
Materials
- Material:
- 1. Main Fabric (cotton), 12" x 6", prewash
- 2. Lining Fabric (cotton or flannel), 10" x 6", prewash
- 3. Round Cord Elastic Band 1/16" (you can buy from hair accessories section, or here), 16"
- Face Mask Sewing Pattern, download and print separately. Updated with Men's size.
Tools
- 1. Sewing essential
- 2. Sewing Machine or hand sew
- 3. Iron
- 4. Seamstress tracing wheel and paper
Instructions
- Download and print out the Face Mask Sewing Pattern separately.
- Pin to fabric, trace and cut out the fabric pieces.
- Sew, clip curve along on the seam allowance, turn face mask right-side out. Topstitch.
- Sew ears to the face mask. Insert elastic cord to the ear-pocket.
More Details on how to sew the Face Mask

Download and print out the Face Mask Sewing Pattern separately. Don’t scale the printing, it is in letter size paper (8.5″ x 11″) so you should have no problem printing it in full scale. There is a 2″ scale marking for you to check if you are printing it in the right size.
Cut out the pattern of your size.[Remark: It is a pdf document and will be open in a new tab or window, or asking you to download. Please make sure your computer has the supported software for it to open correctly. Unblock your computer “pop-up blocker” for this site if you have it enable.]
[Important: Don’t print the pattern from the browser, the size is not correct. Please open the pdf pattern in Adobe Reader or Adobe Pro and print from there]
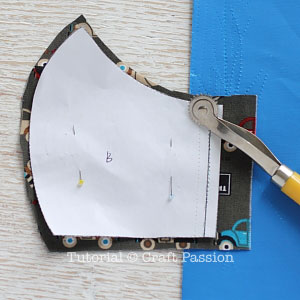
Fold the main fabric into halve with the wrong side facing each other, pin the paper pattern onto the double-layered fabric. Cut the fabric with 1/4″ allowance, except the ear side. Cut the fabric at the ear side with 1″ seam allowance.
Insert the tracing paper between the layer, trace sewing lines with tracing wheel.
Remove pins and paper pattern, get set to sew.

Repeat the same as the main fabric, except the ear side seam allowance. Cut the fabric at the ear side with zero seam allowance.

Turn the face mask main piece with right side facing each other, sew the centerline of the face mask.

Clip curve along with the seam allowance, be careful and don’t accidentally clip on the stitches.

Press seam allowance to one side, topstitch near to the seam line on the side where the seam allowance is.

Repeat the sewing on the lining part.

Flip the lining and place onto the main face mask, align the center seam line, pin and sew the top and bottom lines.

Turn the face mask right side out. Press seam neatly and topstitch near the edge.

This is how it looks like from the inside at this stage. The main fabric of the side ear area is longer than the lining piece. This is going to be the pocket of the elastic band.

Fold in 1/4″ at the raw edge of the side ear, fold again so that the first fold edge is 1/4″ from the lining raw edge.
Sew a straight line down, don’t forget to perform a few back stitches to lock the thread end.

Measure and cut the length of the elastic band needed (usually around 6″-8″ depending on the size of the face).
Insert the elastic band through the pocket and tie a dead knot to the ends.

Repeat the same to the other side. Pull the elastic band until the knots are hidden in the pocket.
Wear and breathe normally!
UPDATE: A different way to wear the elastic band that will put less stress on the ears.

Instead of splitting the elastic band into 2, use the full length and insert through the pockets as shown in the picture, tie a knot and hide the knot in the pocket.

Wear the face mask with the elastic band sits at the back of the head.

No more stress on the ears with this method.
Face Mask With A Pocket For Filter Insert

Get ready for all the materials as stated in the material list above.

Fold the fabric with the wrong side facing each other, place the paper template on it, pin.
Cut the fabric out with ⅜” seam allowance, except the side of the face mask: 1″ for the outer layer, ½” for the inner layer.
Trace the sewing lines with the tracing paper and tracing wheel.

Turn the pieces over and pin the pair together with the right side facing each other. Sew the curved lines as shown in the picture.
Draw a line ¼” from the original side sewing line of the inner layer, do the same to the other side of the inner layer.

Clip the seam allowance about ½” apart. This will let the fabric’s raw edge to stretch without pulling the seam when you turn it right side out. Repeat this on both the outer layer and the inner layer.

Turn the pieces right side out, press the seam allowance to one side, topstitch near the seam line. Repeat the same to the inner layer.

Fold the side at the second line drawn next to the original sewing line of the inner layer. Fold the raw edge and hide inside the fold. Topstitch to sew it on. Repeat on both sides of the inner layer.

Place the inner layer on top of the outer layer, with the right side facing each other.
Sew the top and bottom seam lines.
You may notice that the edge of the inner layer is now ¼” away from the sewing line of the outer layer. If it is not the case, please check if you sewing it correctly in the previous step.

Clip curve on the seam allowance where the 2 layers meet. Leave about 1/2″ from the ends un-clip.
Turn the face mask right side out. Press seam flat.

Double fold the top and bottom raw edges of the outer layer (both sides). Topstitch near the edge as shown in the picture. Repeat the same to the bottom seam line.
To make the pocket for the elastic band, fold the side raw edge 1/4″ from the edge, then fold again so that the edge meets the edge of the inner layer.

Topstitch a vertical line to sew it on. The top and bottom have an opening for you to insert your elastic band.
I added my label while sewing it.

This is the opening for the filter insert.

Add elastic bands to the pocket face mask the way you like and it is really to be worn.

Insert a surgical mask if you are using the face mask as a cover.
Insert a non-woven fabric if you can’t find any surgical maskin the market. I air-dried a piece of the anti-bacteria wet wipe as the filter insert. Throw away the filter correctly and wash the face mask every day.
Disclaimer: this face mask is not meant to replace the surgical face mask.

Insert the medium into the pocket from both openings of the face mask. Adjust it nicely so that the medium doesn’t crumple up.

After the surgical mask is fully inside the cover, push the nose wire of the surgical mask to the tip of the cover, bend the wire a little to follow the curve.

The filter insert must be placed till the tip of the face mask, where the nose position is at.
Poslední úprava: 17.03.2020, 08:25:34 (před 1503 dny a0 hod )
